Troubleshooting

Using Kits

The keyboard PCB is actually a relatively simple and stable circuit. There are no high-power electronic components or consumable electronic parts in the keyboard circuit, which allows the keyboard PCB to maintain good stability and durability under normal storage conditions and usage. Therefore, when input issues arise, there is no need to worry immediately about whether the keyboard PCB has been damaged due to prolonged use. We should first identify the specific symptoms to narrow down the exact problem before exploring solutions. It is recommended to connect the keyboard directly to the computer via a USB cable without using a USB hub during the diagnosis of keyboard PCB issues.

Keyboard Connection Issues

1) When connecting the keyboard directly to the computer via USB, if the system fails to detect the USB device or shows a message indicating that it cannot recognize the inserted USB device
First, check if there is a poor connection at the USB port where the keyboard is connected. If wiggling the USB plug still does not produce a response, it can be determined that there is likely a hardware fault with the keyboard PCB.

2) When connecting the keyboard directly to the computer via USB, if the system sometimes detects the keyboard while at other times it disconnects, and if the USB port feels loose
The keyboard PCB uses a standard Type-C connector, and due to custom keyboard design issues, there may usually be tolerances around the Type-C port. During use, even normal plugging and unplugging of the USB cable could cause deformation in the metal shell of the Type-C interface, leading to looseness. This is a common issue for customized keyboard PCB.
Solution: After detaching the keyboard PCB or USB daughter board, gently squeeze the metal shell of the USB port with pliers to restore its normal tightness. Be careful not to apply excessive force that may overly deform the metal shell, making plugging and unplugging difficult.

3) When connecting the keyboard directly to the computer via USB, if the system sometimes detects the keyboard but it does not input any key values
Please try putting the keyboard PCB into DFU mode. If the keyboard cannot enter DFU mode or remains stuck in DFU mode, it can be confirmed that there is a hardware fault with the keyboard PCB.
If the keyboard PCB can enter normal DFU mode, please try reinstalling the drivers and firmware, and ensure that the PC’s device manager correctly recognizes the keyboard as a HID keyboard.


Input Issues

1) If one or several keys on the keyboard are causing continuous repeating triggering or are unresponsive
First, check whether there is an issue with the switch or the switch socket on the keyboard PCB. Typically, the solder joints of the switch sockets should be secure; however, it is possible for the solder joints to become disconnected due to soldering defects. Therefore, confirm whether any solder joints are broken and need re-soldering.

If the solder joints of the switch sockets are intact, try replacing the switches at those key positions with new working switches to see if the situation improves.

If you prefer not to replace the switches at this point, you can use tweezers to temporarily short the two solder points of the switch or the two metal contacts of the switch socket to test for stable triggering.
If normal triggering occurs, it indicates that the switch at that position is faulty and needs replacement.

If triggering still does not occur, use one pair of tweezers to hold the two solder points of the diode at that key position while using another pair of tweezers to short the two solder points of the switch or the two metal contacts of the switch socket. If triggering occurs at this point, it suggests that the diode for that key position is damaged.

2) A Row or Column of Keys Not Triggering Values
This issue may arise from problems with the solder joints of the microcontroller chip on the keyboard PCB. Such issues can typically be resolved by re-soldering the pins of the main control chip.

3) Random Key Triggering or Some Keys Not Triggering
This could indicate a short circuit in some part of the circuit or interference from static electricity. In such cases, you should first remove the keyboard PCB from its housing and conduct individual key tests to further identify the problem.

If you have trouble to make the keyboard recognized by PC, under most circumstances the connecting issue is caused by driver.  

Reinstall libusb driver as follows:

1. Download zadig.

2. Put keyboard into DFU. There are several ways: (1) Press ESC and plug in the USB cable as the same time.  (2) Press spacebar and ‘B’ and plug in the USB cable. (3)  Push reset button on the PCB or short the circuit.  Check QMK Toolbox to see if ‘DFU device connected’ warning has been displayed.

3. Open zadig and click Options menu and check ‘List All Devices’, you will be able to see the MCU in DFU mode.
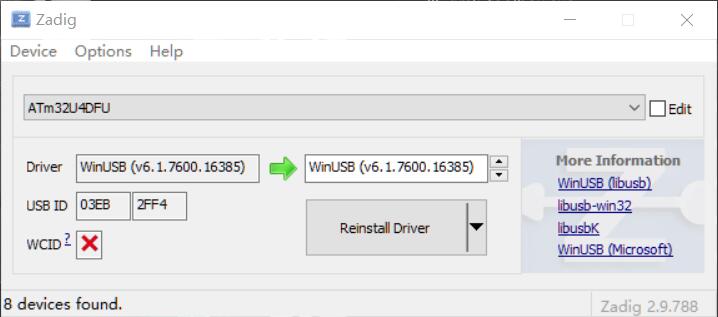
Choose WinUSB and reinstall or install driver, the keyboard should be  recognized correctly. 

Update: QMK Toolbox has updated the DFU support for libusb-win32 driver since Jun 13, 2024. WinUSB is recommended for both ATm32U4 and STM32F072 chip. But for previous version, you can choose libusb-win32 for ATm32U4DFU and WinUSB for STM32F072 as driver. 

Notice:

1. Under some circumstances, ‘Search for device’ under VIA could be solved by this method.

2. Make sure the chip has been put into DFU mode before using Zadig.

3. If you connect the keyboard to Mac for the first time, please close the keyboard setup dialog after it pops out. Following the setup will cause system remapping of key values. 

Pls refer to Bootloader Driver Installation with Zadig | QMK Firmware

套件使用

键盘PCB其实是个比较简单稳定的电路。键盘电路中并不存在大功率电子元件也没有消耗型的电子元器件,因此在通常保存环境和使用条件下,键盘PCB能够保持很好的稳定和耐久性。所以当输入出现异常时,首先不用担心是否键盘PCB已经因为使用过久造成了损坏,我们需要先确定具体的症状以便锁定具体的问题,再看如何解决。建议在诊断键盘问题的过程中,采用键盘通过USB线直接连接到电脑,不经过USB hub。

以下是一些常见问题的诊断指南

键盘连接问题

1) 将用USB线直连电脑后系统无法检测到USB设备插入,或者系统提示无法识别插入的USB设备
可以先确认是否存在连接键盘的USB口是否存在接触不良的问题。如果晃动USB插口依然没有反应,基本可以确定键盘PCB出现硬件故障。

2) 将用USB线直连电脑后系统有时候能检测到键盘连接,有时候断连,USB口有点晃动
因为键盘PCB使用的是通用标准type c插口,并且由于定制键盘设计问题,通常type c口周围会留有公差。在使用过程中,即使是正常插拔USB线可能会造成type c接口的金属外壳变形后造成松动。这个是非常正常的现象。
解决办法:将键盘PCB或者USB子板取下后,用钳子轻微上下夹紧USB口的金属外壳,使其恢复正常结合状态。注意不要使用过大的力造成USB口的金属外壳变形过度造成插拔困难。

3) 将用USB线直连电脑后系统有时候能检测到键盘连接,但键盘无法输入任何键值
请先尝试将键盘PCB接入DFU模式。如果键盘无法进入DFU模式或者键盘一直处于DFU模式,基本可以确定键盘PCB出现硬件故障。
如果键盘PCB可以进入正常DFU模式,请尝试重新安装驱动和固件,并确保PC的设备管理器正常识别键盘。

输入问题

1) 键盘的某个键或者某几个键出现连续快速触发,或者没有反应的问题
出现此类情况,首先先排除键盘PCB上所使用的轴或者轴座是否产生问题。通常情况下,轴座焊接在键盘PCB上的焊点应当是比较牢固的,但不排除焊点可能因为焊接缺陷造成分离。所以先确认轴座焊点是否有断开的问题,需要补焊。如果轴座焊点完好,可以尝试将这些键位的轴换上可以使用的新轴,看情况是否有改善。
如果是焊接PCB或者不想换轴,可以先尝试用镊子短接轴的两个焊接脚或者热插拔轴座的两个金属片,看是否可以稳定触发。
如果可以正常触发,说明该键位的轴出现了问题,需要更换。
如果还是不能触发,尝试用一个镊子先夹住键位的二极管的两个焊点,同时用另一个镊子短接轴的两个焊接脚或者热插拔轴座的两个金属片,如果此时能够触发,说明该键位的二极管损坏。

2) 键盘的某行或者某列键无法触发键值
键盘PCB上的主控芯片焊点出现问题,会发生此类问题。这类问题可以通对主控芯片引脚补焊解决。

3) 随机出现的键位触发或者部分键不触发的问题
存在部分电路短路或者静电影响。如果发生此类情况需要先把键盘PCB从键盘外壳中取出,单独进行键位测试以进一步锁定问题。

大多数情况下,连接问题主要由驱动问题导致。如果遇到插入键盘后USB设备已经在硬件设备管理器列表中但是键盘没有反应,基本可以确定是USB设备驱动没有正确加载,需要重新加载针对键盘设备的驱动。

针对键盘重新安装驱动的方法如下:

1. 下载zadig

2. 将键盘主控设置到DFU状态。将键盘主控设置到DFU状态有多种方法,大多数QMK方案的键盘可以用(1)按住ESC(键盘矩阵中的第一个键)插入USB线;(2)按住空格+字母B键插入USB线;(3)PCB上或者背面有重置按钮或者短接线路。是否进入DFU状态,可以通过QMK Toolbox查看是否出现黄色的‘DFU device connected’字样。

3. 将键盘主控设置到DFU状态之后,打开zadig并在菜单Options下选择‘List All Devices’,可以在下拉列表中看见‘ATm32UXDFU’的选项。

将Driver选择为WinUSB并点击安装或重新安装驱动。

更新:从2024年6月开始,QMK更新了QMK Toolbox对libusb-win32的支持,全面使用WinUSB。对于之前的版本可以选择libusb-win32(对于ATm32U4)或者WinUSB(对于STM32F072)进行驱动安装,键盘重新插拔后应当可以正确识别。

注意:

1. 在某些情况下,已经确认可以被VIA自动识别的键盘在打开VIA出现‘Search for device’也可以用这个方法解决。

2. 请在使用zadig之前确定键盘已经进入DFU状态。

3. Mac系统的电脑初次使用键盘时,插入键盘会弹出键盘识别对话框,请勿按照对话框要求进行操作,这将导致之后的键盘键位键值出现系统级的转换,直接关闭对话框即可。

其他参见Bootloader Driver Installation with Zadig | QMK Firmware